
CrossBow
-
Posts
1,386 -
Joined
-
Last visited
-
Days Won
31
Content Type
Profiles
Forums
Blogs
Gallery
Store
Events
Downloads
Posts posted by CrossBow
-
-
This is a simple adapter that plugs into your 7800's normal power port on the back and provides you with a more standard barrel jack on the end allowing you to use a Genesis model 1 1602, Master system, Jaguar power supply or any power supply that provides 9v @ 1amp or more current with center negative polarity designed to fit in a barrel jack 2.1mm x 5mm diameter size.
Below is a link to see one of these in use.
These measure roughly 1ft in length and the colors of the plugs aren't important and was just whatever shrink tubing I had laying around. I also made two shorter 6 inch adapter versions but as the same materials are bought to make them, they are the same price.
I'm currently SOLD out of these adapters at this time.
Price is $15 shipped via 1st class parcel in a padded envelope to the lower 48 States. I can ship via priority for more if wanted. Just send me a PM.

- HDN, RickR and socrates63
-
 3
3
-
Fractalus is one of my favorite games on the 5200. And it is a good game to pop in for burn in testing of lots of things. It has an attract mode so you can leave it in and turn on the system and just let it run to verify all the logic is working and graphics etc. It uses quite a few buttons on the controller so it is good to test with refurbed controllers as well. And it is a really fun game to boot! Although I tend to start on a higher level like around 6 or so since that is when it starts to get more interesting.
- socrates63, RickR and Justin
-
3
-
Donkey Kong JR and Mario Bros. While the audio is... well it is the TIA afterall, most if not all of the game play elements from the arcade games are intact and seem to match closely.
- nosweargamer and socrates63
-
2
-
Well, I have the PS2 via component connected through my Extron, and originally when I had my Extron set at 720P the PS2 didn't look that great and was kinda soft. That is when I discovered that my signal from the Extron is just being passed through the OSSC with the OSSC just converting that VGA singla to HDMI but nothing else. I then found out that as long as the input resolution doesn't exceed 480P, then the OSSC will allow you to use scale settings on the video signals. So with the Extron dropped to 640x480P, I can use the 2x scale option through the OSSC and once I did that, the PS2 and the Wii both came out looking much clearer! Again the best video quality I get bar none thus far is my Genesis through the HDretrovision cables and with my subcolor signal trace removed off the mainboard and a switch installed to turn it on and off as needed. Even though that is only a component signal, I can use 5x mode on the OSSC on my TV for the Genesis and most of my other systems. Some Genesis games due to odd resolutions, I have to run at a 3x mode but they still look pretty darn good. Next best looking system would be the SNES and Saturn through RGB with the Jaguar just below them. Then it would be the 5200 and the 7800 via S-video off the Extron.
-
2 hours ago, HDN said:
You guys are fancy! I just daisy chain a bunch of coax cables together and call it a day.
Not fancy...just practical and if I'm gaming on a big screen TV I want my stuff to have some consistency in regards to the video signal quality I'm getting from each system. I'm still sore about my SMS having horrid jail bars through s-video output on it and there isn't much I can do to prevent it. I could get a set of HDretrovision cables for it and I know that would look awesome as I've done it with the set I have on my Genesis in the past to test it, but I don't play my SMS enough to warrant that purchase yet.
All of my older consoles on composite and s-video go through one of these bad boys right here:

That is two of them stacked so you can see the front and rear. But this will take composite, VGA, RGB, Component, and s-video inputs and outputs everything as an RGBHV VGA signal. I can adjust the VGA output resolution all the way to 1080P if I want. But I actually have it set at 640x480P because doing that I can then use the 2x mode on the OSSC and get an even clearer overall picture from the systems. Anything over 480P on the VGA will just cause the OSSC to passthrough the signal as it is. Not everything looks right on the LCD in that resolution and it tends to be a bit softer than going through OSSC. I also have my PS2 and Wii connected to this via component.
I modified my Extron by adding in a power switch so I can actually turn it on and off at will since these are originally designed to be installed into an AV rack system and just always be powered on. I also installed a Noctua fan into it so it that it is much much quieter than it was before.
-
Well..as an example of what I was talking about in regards to decent deals. Here is an OSSC with power supply and remote...etc at the AA marketplace for a good price.
- Justin and socrates63
-
1
-
 1
1
-
Well, I've been pretty lucky with the stuff I've bought for the game room over the years. Most of it has been used or open box deals etc. The OSSC and the SCART switcher plus power supplies, and remote I got from an AA member who decided to go back to using a CRT. I was able to pick up the OSSC and the rest of the stuff for about $175 at the time which was an good deal because the OSSC with cables, a SCART switchers, PSU, and remote would have ran me at least $250 - $300 depending on where I got them from separately at the time. So yeah.. $175 shipped was a good deal at the time. The Extron 7SC I got off shop goodwill for about $45 shipped as I recall. But I spent another $50 in accessories to use it to the fullest.
My sound setup has evolved over the years but the center of it all is an old Yamaha 5.1 surround receiver with 4 HDMI pass-through inputs, component, composite. I got is as an open box item from Best Buy years ago for like $100. It was still worth quite a bit more than that when I got it. That was well over 10 years ago though now. But I don't use it as a switcher. I only use the audio on it. I have it set on the retro stuff to do stereo separation across all 5 speakers. The speakers are also stuff I've had on hand over the years or got for really cheap. The rear channels are part of what is left of my Klipsch 2.1 THX system I was using on my computer for several years. When the left channel on the amp (In the sub woofer) gave out and I wasn't able to fix it, I decided to mount them to the upper corners in the game room and use them as rear channel speakers. They seem to do alright that way. The front channel speakers are a set of Roland MA-30s that I got from Reverb.com about 2 years ago. They were only like $30 shipped or something like that? They are from the 90s but are excellent because they are passive studio micro monitor speakers. The center channel and the sub are actually from the older Klipsch setup we were using in our home theater. We replaced that setup with Jamo speakers throughout about 5 or so years ago. I did find a use for the old sub off my Klispch pro media I was using on my PC. Since it was only the left channel that was out, I now have it in the bedroom as an active sub woofer since it only needs a mono audio source input anyway to work.
So I guess over the years there was money spent sure...but then I've managed to find uses for the old when replaced with new. We do the same with our TVs LOL. The TV we did have in the home theater is now in the bedroom as well and the TV that was in the bedroom is what I'm using the game room.
- Sabertooth, Justin and socrates63
-
3
-
4 minutes ago, socrates63 said:
Wow, so this is why people talk about getting an RGB signal out from consoles. Even on these still shots, the difference in quality is very apparent. You do a lot of cool stuff, Jesse. Thanks for sharing and explaining.
Yes, but the cost for the equipment to actually use it can be a bit expensive LOL! In my case I have a 3 SCART auto switcher so I can connect up 3 different RGB sources via SCART. Technically I also have RGB input ability on my Extron 7SC but I would have to get and likely make cables to use it with my consoles because it has all BNC connectors on the back of it. And I don't know that anyone just makes a good quality Genesis 2 AV to BNC breakout cable. Anyway, yeah...got that plus I have the OSSC that all the SCART rgb stuff eventually plugs into. From there HDMI to the modern TV in the game room.
However, my Genesis va2 with HDRetrovision cables connected to the OSSC via component is my console with the best overall analog image quality I have in my setup. The s-video setups look really good as well and in fact more than once I've had other gamers at my house in the past with RGB that thought my 7800 and 5200 were actually running RGB because of how clear those look through my setup. Since there isn't an s-video solution that works well for the colecovision, I figured I would try and put RGB on it and test it out to see what the results looked like. The results...are quite nice!
- Sabertooth, socrates63 and Justin
-
2
-
1
-
Thanks you two! It is a pretty simple job to do compared to some other stuff I've done. I think the most tricky have been the HiDef NES and the DCDigital although the DCDigital one went much smoother than I had initially figured it would take me. But yeah, I might add the TMS-RGB to my list of services for current and future clients of mine.
- socrates63, Justin and Sabertooth
-
3
-
I installed this setup into my pretty decently upgraded CV last night. It is the new TMS-RGB solution for the Colecovision and it was created to address some of the issues with the older Citrus3000 RGB solution from a few years back. The board is very easy to install with only 1 component really having to come off the mainboard to provide a more clear picture and even then, it might not even need to be removed from most NTSC setups.
What you use for getting your RGB out to your display is up to you, but I went with using the common Sega Genesis/Megadrive model 2 AV out port. But my initial plan to install it where I wanted ended up not working out because of the placement of the RCA output jacks I already have installed for the composite output. So I had to go a more difficult and time consuming route but I'm quite pleased with the results. I might add it to my list of services I can offer since it is inexpensive for the kit compared to most solutions for other systems these days and there are a number of ways that you an install the RGB output. In my case the genesis model 2 port is soldered upside down directly to the ground plain along the mainboard to both provide the ground it needs and also to secure it in place without the need for epoxy or other glues in this case. It also keeps the entire kit on the board so that no addition connectors are needed as I have to do with my other AV upgrades I provide usually. Another nice thing about using the Genesis 2 AV port is that you could wire composite into it as well if you wanted. I didn't since again I already had the RCA jacks in place and removing those doesn't make sense. But yes I'm quite pleased with the results and haven't seen a colecovision look this good on a modern display before. I'm sure the CV flashback and the F-18 video upgrades are excellent but I've not seen either of those in person on a modern display so this is my only reference.
Here is the TMS-RGB installed on the bottom of the CV mainboard. It just solderd onto the pins of the VDP. The thing orange wire is not part of the mod and is instead a repair for a broken trace I did several years ago. White wire is to route audio to the RGB out port.

Here is the top component side of my CV. The +5v RAM was done years ago and you can see my Retrofixes composite board in the center that was wired up previously.

Closeup of the TMS-RGB board installed.

Here is the RGB AV output I installed. Yes I had to drill out a hole that was large enough for an actual Genesis 2 AV cable to fit through.

Here is shot of the Genesis 2 AV port that is being used for RGB output. It is soldered upside down to the ground plain of the CV mainboard for both its required ground and for stability. It is actually soldered around 3 sides. Left/Right and the rear.

here is the other side of it where you can see the other side soldered down to the mainboard.

Here is the AV port and wiring when the RF shields are put back in place. I had to notch out both the bottom and top RF shields to allow access for the ribbon cable. I could have left the top RF shield alone and it would have just sat ontop of the cabling but because I had to remove the rear left tab that screws down from the RF to the mainboard to make room for the RGB connector, I decided to solder down the side to the mainboard as additional stability for the top RF shield.

This is the Fathom title screen through normal RF on my LCD in the game room. Not bad but the diagonal lines actually move around while the image is up and it is beyond annoying. Also the image is a bit blurry through RF.

Here is the Fathom title screen through composite on my LCD. Clearer and sharper picture but it also seems to suffer from quite a bit of dot crawl and color artifacting as seen in the rainbow effect around white objects.

And here is the Fathom title screen through the new RGB out that goes into my OSSC and back to my LCD via HDMI. The picture speaks for itself really.

-
I wasn't aware of any crashing issues with food fight on 7800s interesting. I still own both my original Choplifter and Food fight carts. Neither one ever had any issues on my original 7800 back then. But the choplifter graphical glitch does occur on my slightly newer daily driver 7800 that I use mainly. But I don't think I've ever played a lot of Food Fight on it to know if has issues with that game or not.
-
12 hours ago, HDN said:
I've long wondered how they started those things. You can't order them from suppliers because no one makes those old games anymore. Maybe flea markets, garage sales, asking around, craigslist, etc? I know nothing about business if you couldn't already tell.
It's unfortunate about your GameStop but don't feel too bad because it's GameStop. They suck. If it was a local place it would be worse.
Well, I can tell you how the main ones we have here in my area got started.
The largest chain of retrogame stores here is known as Vintage Stock. They are known as he Movie Trading Company in Tx. And also under the name of Edutainmart in the Missouri area I think. But they are all owned by the same group. However, it all started with a single store in Joplin Missouri called The Book Barn. As the name implies they dealt in used books and comics originally. But then started to take on other pop culture stuff and realized within a few years that there was more they could offer and take in as trade..etc that no other stores around them were doing. And that is about when they started to take in old video games. They carried everything from Odyysey 2, 2600 to NES, Genesis, and Saturn/N64 and PS1 at that time. Eventually Dreamcast etc would be taken in and included. I believe around the late 90s is when the Book Barn expanded into other locations and into Oklahoma under the new name of Vintage Stock. It was in the late 90s and early 2000s that I got most of my games from them as they were quite cheap back then and the whole value of these games wasn't a commonly known thing. Anyway, Vintage Stock essentially amassed into quite the empire that still exists to this day. But now of course they know about the value of these games and the days of getting good deals from them are largely gone unless you know someone on the inside who works for them. Anyway... they weren't the only ones back then. We also had a small chain of video game stores known as GameXChange but the ones in my town were a franchise owned by a local family and collector. He initially started off his stock of stuff at his three stores back then by actually offering and selling his own stuff from his personal collection since the 80s. Again good deals could be had back then on stuff and like Vintage, they took in trades of used modern games and offered those as well. They also would get in stock of new current stuff to sell as well. But in the mid 2000s they began to loose to Vintage Stock, GameStop and eventually all the GameXChanges in my area closed up. There are still a few left in the state but they aren't anything as good as what we had in my area in the late 90s and early 2000s.
About 2011 or 2012 a new retro themed game shop opened up that had retro systems setup to be played on and used to test games and only dealt initially with used older games. They got their stock of initial inventory because they borrowed it from another retro store in another town that had surplus and the operator of this new store in my city was employed originally at the other store in the other town about an hour away. So they partnered as it were with the main store in the other town as the primary financial backing to the new and smaller store in my city. However, they had more reasonable pricing in place for their older games as compared to GameStop and Vintage Stock. As a result, they quickly gained popularity and also had games for systems that weren't nearly as common and the other stores didn't carry. Like imports and TurboGrafix...etc. They still exist to this day in the same location they started off in nearly 10 years ago and while they now offer both retro and modern, they also have arcades setup to play on, they offer refurbed consoles and even do mod work on consoles they sell. They are pretty much the best 'game' in town for retro collectors and known throughout the state. That store is known as ThrillHouse Games and they are only 5min from my house. I've a good relationship with them and even repaired a few of their systems they didn't want to bother with.
But to answer this question, these stores all pretty much got started using inventory that the owner already had managed to acquire over the span of several years prior to opening their stores.
-
11 hours ago, Atari 5200 Guy said:
I'd have to paint that sucker black and put silver accents on the doors (close to the wood going vertical) and across the top lid close to the back or about in the same place as what is on the 5200. But that's just me. And I love your 4-port setup!! It's nice to see another 5200 have a good home. I have Sinistar and it's a really fun game to play on the 5200. I have yet to find Zaxxon and Star Trek but I'm on the lookout for Gyruss first. That's one of my personal arcade favorites. Nice setup!
Side note: Have you thought about drilling small holes just big enough to use those metal tabs used on shelves with adjustable shelving to help hold your lid when it's closed. Just a question and a thought.
No...I would never alter this cabinet. It was an exclusive cabinet that was offered for Atari Club members I believe and there aren't that many of them around. Originally the top lid has another plexi section that runs along the front of it attached with another small piece of wood frame 90 degrees to the top so that it would sit flush and square. Again it was designed to house a 2600 system. The back of it along the top is opened up for the wiring etc to be connected so that you could literally have this connected and just roll it off to the side when not in use or roll it out and lift the lid for put a game in when you wanted to play. If this one were fully intact, I wouldn't be able to house the 5200 in it because the 5200 has to sit forward of the cabinet a bit for stability since it really isn't that deep/wide on the top. In fact there is about 2 inches or so that hangs out the back and about an inch or so out the front with the 5200 on there.
As for Sinistart, I'm not a huge fan of the arcade game since I'm not very good at it and I don't play my copy that often. Gyruss is another story. I don't have it cib but I do have it loose. If you look carefully in the first pic I posted with the lid closed, look to the upper left center where the large display case is and you will see where my loose 5200 carts reside stacked up. No end labels of course but they are arranged alphabetically by title so I have a decent idea of what game is where in my stack. But yes Gyruss is favorite of mine and I pretty much own it for all the systems it was released on. About 3 or so years ago, I was able to get a full upright working Gyruss cab that sits in my garage along with a few other cabs.
-
Not a video to share this time, although in hindsight I should have made one as a quick tech video. But recently I decided I would get some replacement filter caps for use in standard wall wart power supplies like those used with our Atari, Sega, etc. consoles from back in the day. As I have quite a few of them on hand and wanted to test them out I decided to start with a few Sega Genesis power supplies. I decided to look at three different supplies last night. I first checked the voltages from all of them and they were all pretty normal. One reading about 14v, a model 2 supply reading 13.5, another model 1 reading about 13.8v. Nothing out of the ordinary from such old transformer supplies that don't have a load on them. Still, they are all well over 20 years old so I figured why not.
Now, many of the sega power supplies require a small 4mm hex bit to open them up and that was the case with one of the model 1 supplies I had. I didn't have this tool so I ordered it online. The other two I had actually required a small #5 security torx bit similar to what is used on TurboGrafx and PC engine systems. But that bit I had on hand and with that I was ready to crack them open and get to work.
The first model 1 PSU is one I've been using for a few years on my workbench as a go to PSU for several systems. I've created adapters so that I can use it with several other classic consoles I work on so I don't have to keep a bunch of different ones on hand at the ready. So it has gotten quite a bit of use over the past few years. It required the small 4mm hex bit I had to order. No issues once I got it opened up. Looked okay and had that ages electronics smell but nothing out of the ordinary. Removed the old large 3300µf at 16v capacitor. It seemed to be in good shape still with no evidence of bulging or leaking. Still it is over 20 years old and would hurt to change it out. Did that and working just dandy!
Then I looked at the second one and this one is where I first discovered that the 4mm hex nut driver I'd gotten wouldn't work and I needed to use my #5 security torx instead. Opened it up and it noticed it seemed to be glued shut as the two halves wouldn't separate as easily as the last one had. Interesting..worked on it a bit and was able to get it to come loose on one side. It was right about when I started to grab for a small flat blade screw driver help pry open along the sides that the smell hit me...
If you aren't aware, the old electrolyte used in these older caps smells very much like fish and has an oily consistency to it. And it is very distinctive and not at all like a normal electronics type smell. This wasn't a good sign as that smell would indicate that I was about to discover something nasty inside. Once I got the two halves of the PSU case apart, the smell really hit me and I could see it. A shiny surface on the top of the small PCB around some of the diodes on the PSU and where the output wires are soldered in. I removed the PSU assembly from the case housing and this is what it looked like on top.
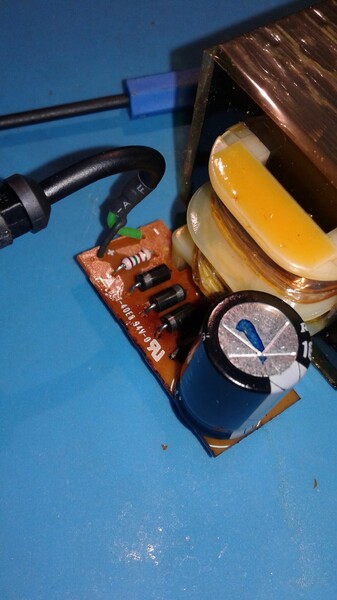
Now it is hard to see, but you can make out the shiny look on the PCB and also where it is a darker color. But the large filter cap looks okay physically right?
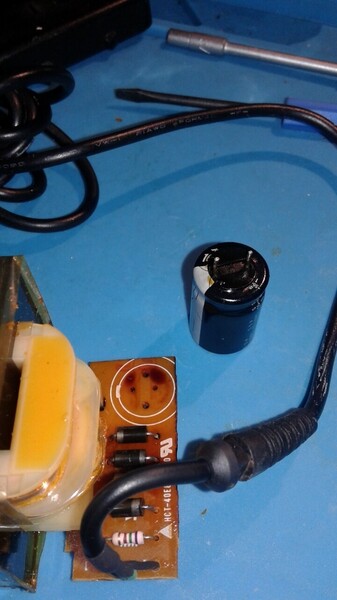
Well not quite because once I removed it you can see near the negative lead of the cap, where it has stained the PCB from electrolyte that has been leaking from the capacitor over the years. Also hard to make out but the bottom of the cap itself was also coated in the oily residue of the leaking electrolyte. Now this doesn't seem like a big deal right? Just clean that off and put in a new cap and your good to go? Well, the bottom side of the PCB where the traces are, has a very different story to tell and shows you the results of what leaking electrolyte does on a PCB over time.
Here you can see where there is a mottled almost moldy look the left half of the bottom of the PCB here. Well, that is where the cap was and where the electrolyte over time has seeped onto the bottom of the PCB and started to corrode the upper layers of the PCB masking and copper traces under neath. This is essentially cancer on a PCB slowly eating away at the board. If this had been something with much smaller traces to components, it would likely be a lost cause or at least require quite a bit of small and time consuming trace repair work. Luckily the traces on most PSUs like this are large and thick. So how do you clean this up? I took my electrical grade 99.9% alcohol cleaning solvent and a toothbrush and went to work to clean and neutralize the electrolyte. In the process of this, the top green layer coating started to flake off exposing the copper traces underneath it since the electrolyte had so badly ate into it. There were also dark patches on the copper itself underneath. This required me to also use my fiberglass pen to remove the remaining layer protecting the traces to fully expose them and also remove the corrosion. This is what it looked like after cleaning and removing most of the corrosion.
Still a few dark patches left behind that has pitted into the copper traces but it shouldn't get any worse than it is now since it is cleaned up. So what now? Well I installed the new replacement filter cap and the used lots of flux and solder to apply a new layer across the traces to protect the copper underneath going forward. This was following up by a lot more cleaning with both a PCB board spray cleaner and lots more high grade alcohol. I then left it out overnight exposed to fully dry out before testing and reassembly.
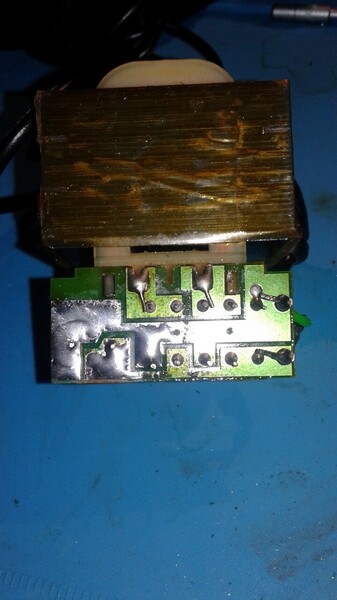
The third PSU was for a model 2 genesis and also required the #5torx security bit to open it. It was like the first PSU in that the capacitor in it wasn't leaking and everything appeared to be fine inside. Just replaced that cap the same way as the first, buttoned it back up and it works just fine.
But the moral of this is that just because a power supply works, doesn't mean that everything inside it is okay and good to go. That second PSU with the leaking cap would have eventually died on me as the traces would have continued to corrode and eventually sever from the rest of the circuit and possible start to lift from the PCB itself. This means that with this wonderful discovery, I need to now try and open up all other PSUs that I'm able to open up easily and inspect them for similar cleaning and possible repairs.
- RickR, socrates63 and Justin
-
1
-
2
-
On 6/9/2020 at 1:09 AM, Justin said:
It's been a while since I've held a "normal" 5200. It would've been the 4-port that has the cable wrap that is a different piece of plastic plugged onto the bottom. If you give it a tug it feels like it will snap and break off.
Those 4-port RF cable wrap guides aren't coming off easily. I've done it before when I received a 4-port missing one and wanted to swap over another to it. It took some doing to get that plastic popped off there. Now, having said that.. I've had more 5200s arrive to me for service work that ended up damaged in shipping than any other console. I've had 2 arrive that flat out came to me with their bottom shells shattered in multiple pieces or with the boss posts broken off internally.
The 7800 shells are brittle yes, but as I'm sure most of you know, I've upgraded a LOT of 7800s over the past 3 years and the success to drilling into that plastic is similar to what @RickR did with his 2600. You apply tape (i use blue painters tape) to the area you need to drill into. This serves 3 purposes honestly:
- it provides a surface you can write on to mark where you need to drill that can be removed easily
- it helps to keep the drill aligned since the tape isn't such a smooth slick surface like the plastic itself would be
- it also helps to add some structure to the plastic as you drill since the stresses of the drill cutting into it are spread out more and the tape applied to the surface helps with this as well.
Having said that, I use a 1/16 bit to drill in my pilot holes. I then have a set of forstner bits of the correct size to finish and make the actual holes in the plastic. Forstner bits are designed more for use with wood but soft plastic is fine. A forstner bit works by providing a larger surface area that is being drilled and again doesn't press so hard in one spot to do the task as a normal bit would. It takes a little longer using a forstner bit because of the way it cuts and they can move on you a bit if you aren't careful while drilling. They are designed for use in drill presses but I've not had any issues using a cordless hand drill with my work. Standard RCA jacks require a 1/4 inch bit and S-video will depend on which jacks you go with. If you use the gold plated ones that stick out from the back similar to an RCA jack, then you only need about a 1/2 inch. If you use the ones I normally use that are more flush mount with the plastic, then you use a 9/16 bit to do the job. I had to order a forstner of that size specifically since most kits won't include that size among them.
Although I've not tried it, I suppose a spade bit similar to what is used when making the bolt opening on doors for your deadbolt etc. could work but they have a wider center section that might put too much pressure on the plastic or make it more difficult to keep straight during the drilling.
- HDN, socrates63, Justin and 1 other
-
4
-
The controllers were okay for the time but as I've gotten older and my hands are bigger, they are somewhat cramp inducing and the sensitivity of the joystick itself seems weak compared to other options.
I now have 2 main ways I play my 7800/2600 games on my system. About a year or so ago I bought one of Curt Vendel's 7800 Arcade pro controllers. I had to do some repairs on the wiring work to get it 100% but it works quite well for most arcade game ports on the system if a bit noisy due to the micro switches in it. And I have one the excellent 7800 controllers that Retrogameboyz sells on ebay and his Etsy store. In fact I've found myself using that controller more than my arcade controller for the last month or so. And to be clear I've owned about a half dozen other NES style 7800 controllers over the years and while they work okay for the most part, they all had some issues with them being mostly that they would register diagonals to easily or some directions just didn't seem to work as well as others. The Retrogameboyz controllers do not seem to suffer these issues and I think it has to do with his PCB contact layout and design. Anyway, his controllers are great but getting one of Edladdin's Seagull 78s is a cheaper option if you already have a Genesis 3 button controller.
Retrogameboyz store on ebay = https://www.ebay.com/usr/retrogameboyz
Retrogameboyz store on Etsy = https://www.etsy.com/shop/RetroGameBoyz
Seagull 78 adapter at AA = https://atariage.com/store/index.php?l=product_detail&p=1079
-
4 minutes ago, HDN said:
@CrossBow Commando looks fun. Never played any version of the game. The nice thing about expensive 7800 games is that they're not terribly sought after. It's not like Commando is Little Samson or Stadium Events.
This is true and in this case Commando might be on the expensive side but it is also a really good port from the arcade.
I forgot to mention that another 7800 favorite of mine is also not that popular. And that is the 7800 version of Crossbow.. .hehe.. go figure? Although I never owned a light gun for my system back in the day and played the game strictly with original CX24 painline controllers back then. But I got to be really good at the game and found I could clear all the areas and defeat the evil magician at the end over and over until I turned it off due to getting bored playing LOL!
- socrates63 and HDN
-
2
-
Yes...AA is a wonderful site and I've been a member there for a very very long time. My personal favorite homebrews for the 7800 would have to be Rikki & Vikki and Astroblaster to be honest. Rikki & Vikki is just amazing technically for the 7800 in addition to being a fun puzzle platformer game. And they are down to their last 50 copies of that game so I wouldn't wait on that one as they do NOT have plans to make another run for the 7800 for that game. Astroblaster is a semi obscure Sega arcade game I believe and PacManPlus (Bob) ported it to the 7800 a few years back. I know his pac-man games are amazing and I do own them, but I'm not a huge pac-man fan honestly so I don't desire to play those games that often. So of Bob's other releases his other arcade ports are fantastic!
While pricey, my favorite 7800 officially released game would probably be Commando. Although I do like Xenophobe quite a bit as well. True the 7800 version isn't the best port with the Lynx actually being my favorite version of the game released but I do find myself popping that game in when I want to play some 7800 for a bit.
Some other homebrews that I play often, are Dungeon Stalker (Excellent take on Night Stalker and even better in my opinion), Donkey Kong PK / XM, and when it gets released, I know that I will be purchasing Knight Guy Castle Days as I've have a blast testing the WIP releases of that game on my 7800.
- HDN and socrates63
-
2
-
1 minute ago, HDN said:
@CrossBow I see you have Adventure II and is that a Sinistar proto repro?
Not a repro well..I guess kinda it is. AtariAge actually did a full release of Sinistar back in 2010 I think it was with a box, manual, and cart. It was a limited release but you can still order the cart and manual from AtariAge still. And yes that Adventure II release is the original release that was also a numbered limited edition that included some extra feelies inside it that later releases didn't have. Like a gold key and some post cards of the game screens etc.
- HDN and socrates63
-
2
-
Yeah the cart I'm using was designed originally to hold a 2600 system and games below it. But since mine is missing the front piece to the lid, it works quite well for housing my 5200. These were taken over 4 years ago, but it still sits in this same cart in the same corner of the game room when not in use. I do have a dust cover on it now though so the lid doesn't just sit ontop of console directly anymore.


- chas10e, socrates63, HDN and 1 other
-
4
-
4 minutes ago, HDN said:
@CrossBow My 2600 is in my bedroom currently. I was thinking of putting the 7800 downstairs in the actual game room to spread the Atari 2600 goodness around the house.
That sounds like an excellent plan! The 7800 is actually a little smaller than the standard 2600 systems minus the JR of course. So I've never really had any issues finding a place for mine. The 5200 and the Colecovision are much more difficult to find space for and I end up storing the 5200 in its own roll around cart and the CV sits sideways on the shelf. I pull the CV out and place it on my table in the center of the Gameroom when I want to play it.
-
I think I've only had 3 actual controllers that went bad beyond repair. 2 of them for sure was due to wiring within the controller cable breaking somewhere internally as they are really thin. Another one I think was due to the plastic that the directional pots sit in breaking so the pot didn't sit properly anymore.
The main issue as @RickR stated is the flex circuits inside loose conductivity due to corrosion very easy. Quick fixes are to simply use a pencil eraser and some alcohol on the flex but that will likely only last for a little while and you will find that you have to do it again soon. The foil dots metheod in combination with a good cleaning of the flex is he method I use and my controllers seems to work fine for several years before I have to go through the refurb process on them again. But for the 30min or so per controller it might take to do that, I'm okay with it.
- RickR and socrates63
-
2
-
12 hours ago, HDN said:
Thanks, @kamakazi20012. Only problem is I don't think I have a place to put it... It's too wide to fit in one of the cubbyholes that I have in our gameroom. Guess it can just sit on the floor when I get it for a while until I find a good place for it.
Put in place of where your 2600 sits currently perhaps? I have all the variants of the 2600 console released. Not a single one of those 2600 systems is actually connected or at the ready for play because I just use my 7800 for all of that.
- socrates63 and Justin
-
2
-
You might be able to correct some of the screen issues by recapping it as it likely needs it anyway. But yes eventually you will want a McWill in that thing. It is a pretty excellent handheld and I'm sorry I didn't pick one up when they were new back in the day. I went the Game gear route instead during that time. But I don't regret that decision either!


7800 Avenue
in Atari 7800
Posted
Alien Brigade is really the only game that can use both joystick/light gun that pretty much requires the light gun in this case. At least with Crossbow it is easy to line up along the line of something that you know can cause serious harm to the party member walking across the screen and just move left and right to take them out quickly. But with Alien brigade there is way too much happening all over the screen at once. I've never been able to beat AB with joystick but have gotten quite far in it. However, once I got me an XE lightgun about 3 years ago and plugged it up to my CRT. I actually beat it on my first run through. Surprisingly, I didn't do as well with Crossbow with a light gun as I've come to using the joysticks.
Alien Brigade is one of the most impressive overall games for the 7800 as far as the graphics and use of the sound. Too bad more games with as much complexity didn't get developed.